升级 Mastodon - 从 3.1.2 到 4.2.1
2023-11-11
关于 Mastodon
Mastodon 叫「长毛象」,是和猛犸同一时期的物种,现已灭绝。目前它指代是一种开源的 Fediverse(Federation Universe,联邦宇宙)型社交网络软件。互联网上可以有很多 Mastodon 实例,每个实例可以制定自己的规则,可以理解为一个个独立的微博圈子。然后它们之间通过一种协议可以互相访问。
我一直用 Mastodon 来管理我自己的「状态」(即 https://dlyang.tk),以代替我的微信朋友圈、Twitter、微博(我现在已经几乎不在这三者上发状态了)。
本文主要供这样的读者阅读:知道 Mastodon,且 Host 它的实例,需要更新其版本,且使用「Install from source」(源码)方式安装了 Mastodon(区别于用 Docker)。如果不是的话,可以跳过本篇文章。
本来没想着折腾这个东西,但我的 Mastodon 从安装以后就没动过,一直是 3.1.2 版本,用了三年半多了。最近服务器自己重启了一下。本来这些服务会自动启动,但这次没有,我必须手动。然后想着「来都来了」,既然都开始折腾了,干脆就直接升级一下版本吧。
可笑的是,我三年多没碰过这个系统,竟然都忘了自己当初是用 Docker 还是源码安装的了。题外话:当初我先用了 Docker,但是没跑起来,后来就直接从源码装了。但是 Docker 的目录我没删,导致系统里有两份 Mastodon 的工作目录。我看到的时候头有点大。
本次折腾的目标是: 从 3.1.2 升到当前(2023.11.04)最新的 4.2.1 。
注意,本文所有内容都仅供参考,请了解好每一步再执行。出了问题我不负责。
官方教程
官方教程 非常简单,但应该只适用于版本跨度不大的升级。
执行以下步骤可以抓取最新版本。
su - mastodon

cd ~/live
git fetch --tags
搞定所有备份以后, git checkout v4.2.1 。
之后(理论上)结合 Release Note 和 Upgrading to a new release 这两篇的内容跑几个后续的命令迁移一下文件即可。
但是,版本从 v3 到 v4 必然有很多东西是不兼容的。所以果不其然就出了各种问题, 网站一直报错 502 Bad Gateway 。于是开始了我长达 10 个小时的 Debug 之旅。
升级 Ruby 版本
Mastodon v4.2.1 Release Note(Link)里面列举了各种 Dependencies:
- Ruby: 3.0 to 3.2
- PostgreSQL: 10 or newer
- Elasticsearch (recommended, for full-text search): 7.x (OpenSearch should also work)
- LibreTranslate (optional, for translations): 1.3.3 or newer
- Redis: 4 or newer
- Node: 16 or newer
- ImageMagick: 6.9.7-7 or newer
于是我打算先升级 Ruby。
结果发现用 rbenv 安装 Ruby 3.2.2 总是失败。提示如下:
RUBY_CONFIGURE_OPTS=--with-jemalloc rbenv install 3.2.2
To follow progress, use 'tail -f /tmp/ruby-build.20231104163426.7620.log' or pass --verbose
/home/mastodon/.rbenv/plugins/ruby-build/bin/ruby-build: line 1062: "1: syntax error: operand expected (error token is""1")
Downloading openssl-3.1.4.tar.gz...
-> https://dqw8nmjcqpjn7.cloudfront.net/840af5366ab9b522bde525826be3ef0fb0af81c6a9ebd84caa600fea1731eee3
Installing openssl-3.1.4...
Installed openssl-3.1.4 to /home/mastodon/.rbenv/versions/3.2.2

Downloading ruby-3.2.2.tar.gz...
-> https://cache.ruby-lang.org/pub/ruby/3.2/ruby-3.2.2.tar.gz
Installing ruby-3.2.2...

BUILD FAILED (Debian 9.12 using ruby-build 20231025-7-g224e942)

Inspect or clean up the working tree at /tmp/ruby-build.20231104163426.7620.qNTP0F
Results logged to /tmp/ruby-build.20231104163426.7620.log

Last 10 log lines:
cc1: warning: unrecognized command line option ‘-Wno-constant-logical-operand’
cc1: warning: unrecognized command line option ‘-Wno-cast-function-type’
Makefile:325: recipe for target 'ossl_hmac.o' failed
make [2]: *** [ossl_hmac.o] Error 1
make [2]: Leaving directory '/tmp/ruby-build.20231104163426.7620.qNTP0F/ruby-3.2.2/ext/openssl'
exts.mk:273: recipe for target 'ext/openssl/all' failed
make [1]: *** [ext/openssl/all] Error 2
make [1]: Leaving directory '/tmp/ruby-build.20231104163426.7620.qNTP0F/ruby-3.2.2'
uncommon.mk:331: recipe for target 'build-ext' failed
make: *** [build-ext] Error 2
大意是 OpenSSL 编译成功了,但是 Ruby 编译失败。
尝试按 这个页面 的提示安装各种包:
apt-get install autoconf patch build-essential rustc libssl-dev libyaml-dev libreadline6-dev zlib1g-dev libgmp-dev libncurses5-dev libffi-dev libgdbm6 libgdbm-dev libdb-dev uuid-dev
但是效果不行:
libreadline6-dev 、 libgdbm6 、 libgdbm5 都找不到,最后还有错误: libgmp-dev : Depends: libgmp10 (= 2:6.1.2+dfsg-1) but 2:6.1.2+dfsg-1+deb9u1 is to be installed 。
一番 Debug 后,猜想是 Debian 版本太低了。于是着手升级 Debian 版本。
升级 Debian
我之前的 Debian 版本是 9.6,甚至 9.6 都已经被官方 Deprecate 了,deb 包源地址都变成 archive.debian.org 了。
我准备一口气升级到最新的 12。从 ChatGPT 学到了个重点: Debian 升级只能一次升一级,比如从先 9 到 10,再 10 到 11 这样;不能直接 9 到 12 。
这是 Debian 各个版本的代号:
- Debian 9: Stretch
- Debian 10: Buster
- Debian 11: Bullseye
- Debian 12: Bookworm
升级 Debian 的过程需要更新 /etc/apt/sources.list ,把里面版本代号从 Stretch 改成 Buster,然后
sudo apt update
sudo apt upgrade
sudo apt full-upgrade
sudo reboot
一套三连组合拳下来其实系统就升级好了,每次大概下载一个多 GB 的包,直接替换掉原来的。每次升级完可以用 cat /etc/debian_version 检查版本。
注:我的 sources.list 是直接问 ChatGPT 的,网上也有很多案例,这里就不放了。
再次尝试升级 Ruby
升级到 Debian 12 以后,问题解决了,可以顺利安装所有依赖然后安装 Ruby 3.2.2。
mastodon@server_name:~$ RUBY_CONFIGURE_OPTS=--with-jemalloc rbenv install 3.2.2
To follow progress, use 'tail -f /tmp/ruby-build.20231104195901.15069.log' or pass --verbose
/home/mastodon/.rbenv/plugins/ruby-build/bin/ruby-build: line 1062: "3: syntax error: operand expected (error token is""3")
Downloading openssl-3.1.4.tar.gz...
-> https://dqw8nmjcqpjn7.cloudfront.net/840af5366ab9b522bde525826be3ef0fb0af81c6a9ebd84caa600fea1731eee3
Installing openssl-3.1.4...
Installed openssl-3.1.4 to /home/mastodon/.rbenv/versions/3.2.2

Downloading ruby-3.2.2.tar.gz...
-> https://cache.ruby-lang.org/pub/ruby/3.2/ruby-3.2.2.tar.gz
Installing ruby-3.2.2...
Installed ruby-3.2.2 to /home/mastodon/.rbenv/versions/3.2.2
(👆上面第三行的 Syntax Error 可以忽略。)
确切来说,Ruby 3.2.2 只是一个 Ruby 虚拟环境,一台机器上可以有很多个 Ruby 版本,用 rbenv 可以切换(和 Python pyenv 一样的原理)。
升级 Node
升级到 Debian 12 以后,默认的 Node 版本好像符合要求,但不包含 Corepack(不常用 Node,不知道是干啥的),Corepack 是 Mastodon 的依赖之一。
按照官方的方法重新安装 Node 即可:链接 。
我应该设定的是 NODE_MAJOR=18 。
数据库迁移
Mastodon v4.2.1 只支持 postgreSQL v10 以上版本。原来的 9.6 用不了了。数据库还在 9.6,但是可以通过迁移到最新的 PostgreSQL 解决。
我决定直接升级到最新版 16,继续问 AI 搞定。以下为 ChatGPT 输出:
Updating PostgreSQL for a Mastodon instance is a critical task that should be approached with caution. You must ensure that you have a full backup of your Mastodon database before proceeding, because once you upgrade, you might not be able to downgrade without restoring from a backup.
Here’s a general procedure to update PostgreSQL for Mastodon. Note that the specific steps might vary depending on the versions involved and the system you’re using:
Backup the Database: Use the
pg_dumpcommand to create a backup of your Mastodon database.pg_dump mastodon_production > mastodon_production_backup.sqlStop Mastodon: You should stop all Mastodon processes to ensure that there are no active connections to the database during the upgrade.
注:在我自己机器上需要每个单独暂停,不能按通配符把对应的三个进程终止。
systemctl stop mastodon-*.serviceStop the Current PostgreSQL: Stop the current PostgreSQL service.
sudo systemctl stop postgresqlInstall the New PostgreSQL Version: This step depends on your Linux distribution. If you’re using a distribution like Ubuntu, you might use the
aptpackage manager:sudo apt-get install postgresql-<new_version>Replace
<new_version>with the version number you’re upgrading to, for example,13or14.Migrate the Database: PostgreSQL typically comes with a utility called
pg_upgradethat you can use to upgrade your data files. However, usingpg_upgraderequires understanding command-line options and usually stopping the old database server.Alternatively, if you’re comfortable with PostgreSQL, you might choose to create a new database cluster and then use
pg_dump/pg_restoreto transfer your data:sudo -u postgres pg_createcluster <new_version> main --startThen, import the dump into the new version’s cluster:
psql -d new_mastodon_production -f mastodon_production_backup.sqlUpdate postgresql.conf and pg_hba.conf: If you have any custom configuration in your
postgresql.conforpg_hba.conffiles, make sure to merge those changes into the configuration files of the new PostgreSQL version.Switch the Port: After you upgrade, you might need to switch the port on which PostgreSQL listens back to the default (
5432) if it has changed.sudo -u postgres psql -p <new_cluster_port> ALTER SYSTEM SET port = 5432;Replace
<new_cluster_port>with the port number your new cluster is currently using.Restart the PostgreSQL Service: Once you have migrated the data and configured the server, restart the new PostgreSQL server.
sudo systemctl restart postgresqlVerify the Upgrade: Connect to the database and check the version to verify the upgrade.
psql -d mastodon_production -c 'SELECT version ();'Start Mastodon:
Start Mastodon services back up.
systemctl start mastodon-*.serviceClean Up:
After ensuring that Mastodon is working correctly with the new database version, you can remove the old PostgreSQL version if it is no longer needed.
Remember, the specific commands and the process may vary based on how PostgreSQL was originally installed and configured, and the environment you’re working in. Always refer to the official Mastodon and PostgreSQL documentation for guidance tailored to your setup.
注意:上面的输出都仅供参考,跑之前请了解清楚每条命令的作用,记得做好备份,别把系统整废了。
实际执行中发现 PostgreSQL 16 默认存在一个 Cluster。先停用之:
sudo -u postgres pg_dropcluster --stop 16 main
参考输出:
Warning: systemd was not informed about the removed cluster yet. Operations like "service postgresql start" might fail. To fix, run:
  `sudo systemctl daemon-reload`
- 执行
sudo -u postgres pg_upgradecluster 9.6 main来迁移。
参考输出:
Restarting old cluster with restricted connections...
Notice: extra pg_ctl/postgres options given, bypassing systemctl for start operation
Creating new PostgreSQL cluster 16/main ...
/usr/lib/postgresql/16/bin/initdb -D /var/lib/postgresql/16/main --auth-local peer --auth-host scram-sha-256 --no-instructions --encoding UTF8 --lc-collate en_US.UTF-8 --lc-ctype en_US.UTF-8
The files belonging to this database system will be owned by user "postgres".
This user must also own the server process.

The database cluster will be initialized with locale "en_US.UTF-8".
The default text search configuration will be set to "english".

Data page checksums are disabled.

fixing permissions on existing directory /var/lib/postgresql/16/main ... ok
creating subdirectories ... ok
selecting dynamic shared memory implementation ... posix
selecting default max_connections ... 100
selecting default shared_buffers ... 128MB
selecting default time zone ... Etc/UTC
creating configuration files ... ok
running bootstrap script ... ok
performing post-bootstrap initialization ... ok
syncing data to disk ... ok
Warning: systemd does not know about the new cluster yet. Operations like "service postgresql start" will not handle it. To fix, run:
  sudo systemctl daemon-reload

Copying old configuration files...
Copying old start.conf...
Copying old pg_ctl.conf...
Starting new cluster...
Notice: extra pg_ctl/postgres options given, bypassing systemctl for start operation
Running init phase upgrade hook scripts ...

Roles, databases, schemas, ACLs...
 set_config
------------

(1 row)

 set_config
------------

(1 row)

 set_config
------------

(1 row)

 set_config
------------

(1 row)

Fixing hardcoded library paths for stored procedures...
Upgrading database postgres...
Fixing hardcoded library paths for stored procedures...
Upgrading database mastodon_production...
Fixing hardcoded library paths for stored procedures...
Upgrading database template1...
Stopping target cluster...
Stopping old cluster...
Disabling automatic startup of old cluster...
Starting upgraded cluster on port 5432...
Warning: the cluster will not be running as a systemd service. Consider using systemctl:
  sudo systemctl start postgresql@16-main
Running finish phase upgrade hook scripts ...
vacuumdb: processing database "mastodon_production": Generating minimal optimizer statistics (1 target)
vacuumdb: processing database "postgres": Generating minimal optimizer statistics (1 target)
vacuumdb: processing database "template1": Generating minimal optimizer statistics (1 target)
vacuumdb: processing database "mastodon_production": Generating medium optimizer statistics (10 targets)
vacuumdb: processing database "postgres": Generating medium optimizer statistics (10 targets)
vacuumdb: processing database "template1": Generating medium optimizer statistics (10 targets)
vacuumdb: processing database "mastodon_production": Generating default (full) optimizer statistics
vacuumdb: processing database "postgres": Generating default (full) optimizer statistics
vacuumdb: processing database "template1": Generating default (full) optimizer statistics

Success. Please check that the upgraded cluster works. If it does,
you can remove the old cluster with
    pg_dropcluster 9.6 main

Ver Cluster Port Status Owner    Data directory               Log file
9.6 main    5436 down   postgres /var/lib/postgresql/9.6/main/var/log/postgresql/postgresql-9.6-main.log
Ver Cluster Port Status Owner    Data directory              Log file
16  main    5432 online postgres /var/lib/postgresql/16/main/var/log/postgresql/postgresql-16-main.log
到这里 PostgreSQL 的版本也满足了 Mastodon v4.2.1 的要求了。
解决 mastodon-sidekiq 无限重启问题
把 Ruby、Node、数据库都升级完了以后启动 Mastodon 三大服务:
- mastodon-sidekiq
- mastodon-web
- mastodon-streaming
结果网页还是 502 Bad Gateway。
用 sudo journalctl -u mastodon-XXXX 挨个查看上面的三个进程的日志。发现 mastodon-sidekiq 进程非常频繁地重启,产生了大量的日志。(注:进入日志界面后可以用 Shift+G 直接跳到最后一行;还有一个参数是可以倒叙显示日志,但是读起来不太直观,不推荐)
Debug 尝试 1: 在 .env.production 更新 rake 的 secret
进到 mastodon 用户, cd 到 ./live ,执行
RAILS_ENV=production bundle exec rake secret
得到新的 secret,复制到 .env.production 文件对应的地方
此方法并没有解决问题 。
Debug 尝试 2: DB migration
在 live 目录下执行 rail 的 db 迁移:
RAILS_ENV=production bundle exec rails db:migrate
跑完以后能打开页面了(之前是 502 badgateway)但是提示出错,如下图:
 Mastodon 标志性的错误页面(等效为 500 Internal Server Error),这个表明 mastodon-web 运行起来了但是加载过程中出错
似乎已经非常接近成功。
Fixing ElasticSearch
继续追踪问题,发现此时 mastodon-sidekiq 连接不到 elasticsearch,错误信息:
WARN: Faraday::ConnectionFailed: Connection refused - Connection refused - connect (2) for"localhost"port 9200 (localhost:9200)
检查发现 9200 端口确实没有进程在使用。
根据 Mastodon 官网配置 ES 的教程 把 ES 从 6.x 升级到 7.x:
注意:加了 ES 的 GPG-KEY 签名才能正确加 deb,之后 apt update 才有效。
之后会显示 ES 安装到了 7.17.14 版本(之前是 6.8.x)。
OK,到这里 ElasticSearch 的版本也符合要求了。
解决 ElasticSearch 启动问题
尝试启动 ES,结果刚启动完程序就退出了。日志显示:
Starting elasticsearch.service - Elasticsearch...
systemd [1]: elasticsearch.service: Main process exited, code=killed, status=9/KILL
systemd [1]: elasticsearch.service: Failed with result'signal'.
systemd [1]: Failed to start elasticsearch.service - Elasticsearch.
systemd [1]: elasticsearch.service: Consumed 2.498s CPU time.
根据 ChatGPT 提示,这个可能是内存不足导致的。我的 VPS 只有 1GB 内存,真是少得可怜。之前配置系统的时候已经开了 1GB 的 Swap 当虚拟内存了,现在没办法,继续加到 2GB 吧。
大概的命令如下(网上很多教程,调查清楚了再跑):
sudo dd if=/dev/zero of=/var/swap.img bs=1024k count=2048
sudo mkswap /var/swap.img
df -h  # check size
sudo swapon /var/swap.img
然后 ES 启动成功,占用 600 MB 内存。网上有个说法是不宜让 ES 在 Swap 上面跑,会影响性能。不过我这站点基本就没有别的用户,ES 的性能从来不是我要考虑的东西。
sudo systemctl status elasticsearch.service
● elasticsearch.service - Elasticsearch
     Loaded: loaded (/lib/systemd/system/elasticsearch.service; enabled; preset: enabled)
     Active: active (running) since Sun 2023-11-05 05:01:41 UTC; 9s ago
       Docs: https://www.elastic.co
   Main PID: 185488 (java)
      Tasks: 79 (limit: 1107)
     Memory: 599.3M
        CPU: 37.893s
     CGroup: /system.slice/elasticsearch.service
             ├─185488 /usr/share/elasticsearch/jdk/bin/java -Xshare:auto -Des.networkaddress.cache.ttl=60 -Des.networkaddress.cache.negative.ttl=10 -XX:+AlwaysPreTouch >
             └─185649 /usr/share/elasticsearch/modules/x-pack-ml/platform/linux-x86_64/bin/controller
再下一城!
mastodon-steaming 虚惊一场
配置完 ElasticSearch,网站依旧是 500 Internal Server Error。
此时在读取 mastodon-steaming 日志的时候发现进程启动以后过了一会显示停止了。
mastodon-streaming.service - mastodon-streaming
     Loaded: loaded (/etc/systemd/system/mastodon-streaming.service; enabled; preset: enabled)
     Active: active (exited) since Sun 2023-11-05 05:04:18 UTC; 6min ago
    Process: 186099 ExecStart=/bin/echo mastodon-streaming exists only to collectively start and stop mastodon-streaming@ instances, shimming over the migration to templated mastodon-streaming systemd unit (code=exited, status=0/SUCCESS)
   Main PID: 186099 (code=exited, status=0/SUCCESS)
        CPU: 1ms

Nov 05 05:04:18 server_name systemd [1]: Starting mastodon-streaming.service - mastodon-streaming...
Nov 05 05:04:18 server_name echo [186099]: mastodon-streaming exists only to collectively start and stop mastodon-streaming@ instances, shimming over the migration to templated mastodon-streaming systemd unit
Nov 05 05:04:18 server_name systemd [1]: Finished mastodon-streaming.service - mastodon-streaming.
经过一番搜索,发现这个是预期的行为,没有 Steaming 服务运行的时候好像就不会跑太久,可能是按需启动的服务吧。总之不用管。
500 Internal Server Error 最终解决办法
一言以蔽之:需要重新 compile webpack。
在日志里翻了半天。出错的原因是 mastodon-web 启动的时候会去打包好的 Manifest 里面找一些资源文件。资源文件的索引存在 manifest.json 文件中,但是在该文件里却找不到对应的资源,于是开始重启,然后循环。
 mastodon-web 调试日志里的错误信息
上图的文字版:
Nov 05 03:53:31 server_name bundle [170103]: F, [2023-11-05T03:53:31.261168 #170103] FATAL -- :  [9011ba6e-2818-428c-91cb-f255aec50f3f]
Nov 05 03:53:31 server_name bundle [170103]: [9011ba6e-2818-428c-91cb-f255aec50f3f] ActionView::Template::Error (Webpacker can't find media/icons/favicon-16x16.png in /home/mastodon/live/public/packs/manifest.json. Possible causes:
Nov 05 03:53:31 server_name bundle [170103]: 1. You want to set webpacker.yml value of compile to true for your environment
Nov 05 03:53:31 server_name bundle [170103]:    unless you are using the `webpack -w` or the webpack-dev-server.
Nov 05 03:53:31 server_name bundle [170103]: 2. webpack has not yet re-run to reflect updates.
Nov 05 03:53:31 server_name bundle [170103]: 3. You have misconfigured Webpacker's config/webpacker.yml file.
Nov 05 03:53:31 server_name bundle [170103]: 4. Your webpack configuration is not creating a manifest.
官方教程说可以跑这句命令 RAILS_ENV=production bundle exec rails assets:precompile 去 Pecompile 打包资源,但是好像它一旦检测到打包结果已存在就会跳过一些步骤,导致最后的打包中不含有需要的资源(这是我的理解)。所以找不到资源以后就会报错。所以说,单纯执行这句 precompile 命令不好使。
所以我们要重新编译,更确切地说,是强制 webpacker 去重新编译。
网上可能有其他方法,但是我误打误撞用了个奇葩方法解决了。网上可能有更加高效的方法,但这是我的版本:
首先,安装 webpacker,即使已经有了 webpacker 也是可以安装的,安装过程中它会问是否要重置配置文件,选「是(Y)」。
mastodon@server_name:~/live$ RAILS_ENV=production bundle exec rails webpacker:install
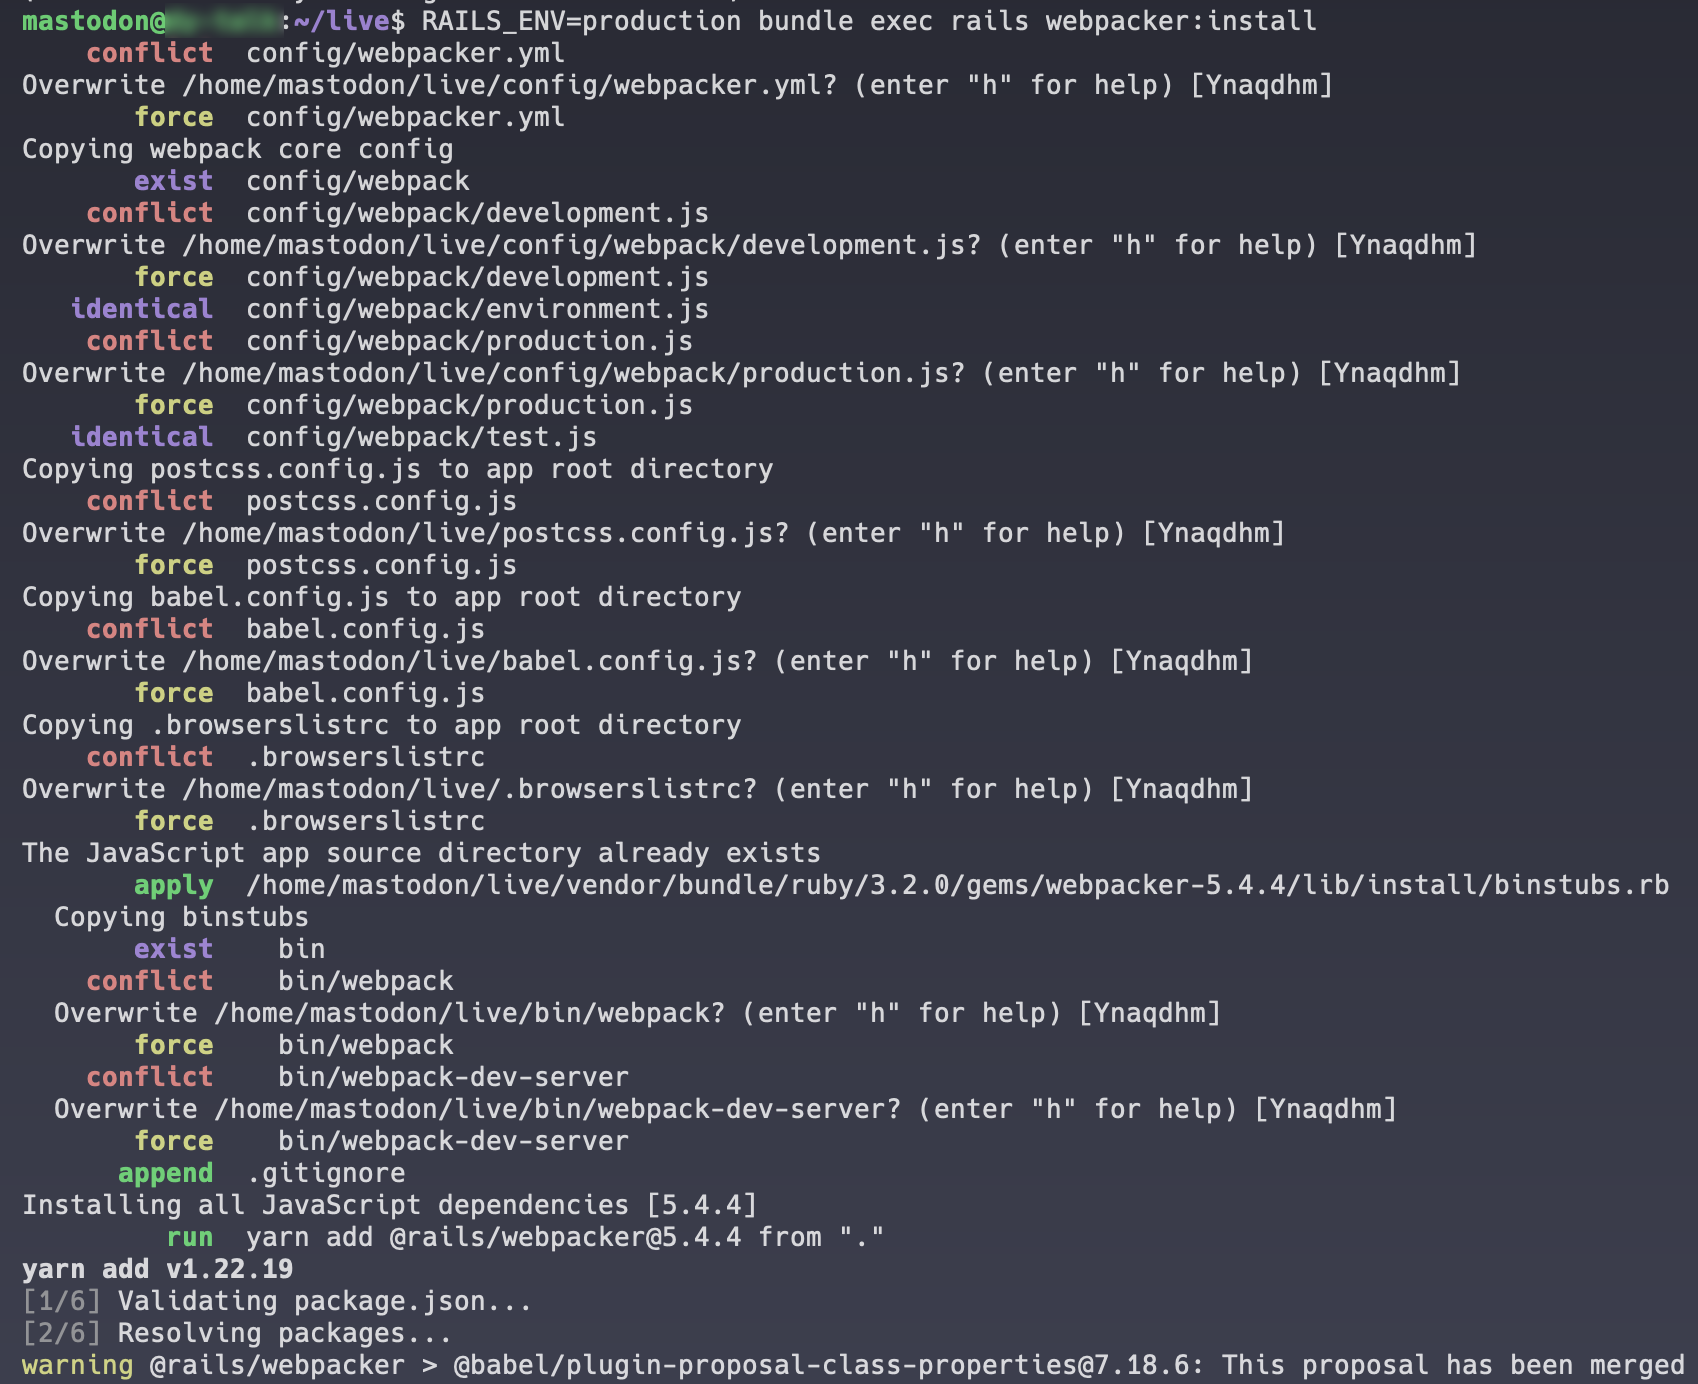 webpecker install 输出
这样,Mastodon 目录下的那些配置文件就会变成别的东西。在所有配置文件被覆盖以后,跑一下这条命令: RAILS_ENV=production bundle exec rails assets:precompile 。
但是它会报错,输出如下:
mastodon@server_name:~/live$ RAILS_ENV=production bundle exec rails assets:precompile
Compiling...
Compilation failed:
/home/mastodon/live/node_modules/webpack-cli/bin/cli.js:93
                throw err;
                ^

Error: Cannot find module '../lib/install/config/webpacker.yml'
尽管如此,这个过程还是改变了很多东西。运行: mastodon@server_name:~/live$ git status 可以看到被修改了的内容:
(use"git restore <file>..." to discard changes in working directory)
    modified:   .browserslistrc
    modified:   .gitignore
    modified:   babel.config.js
    modified:   bin/webpack
    modified:   bin/webpack-dev-server
    modified:   config/webpack/development.js
    modified:   config/webpack/production.js
    modified:   config/webpacker.yml
    modified:   package.json
    modified:   postcss.config.js
    modified:   yarn.lock

Untracked files:
  (use "git add <file>..." to include in what will be committed)
    config/webpack/environment.js
    config/webpack/test.js
这些问题不大,跑一遍 git checkout v4.2.1 重置所有文件即可。这时候只有 environment.js 和 test.js 发生了变化(不知道为什么第一遍 Checkout 的时候没变化)。
mastodon@server_name:~/live$ git status
HEAD detached at v4.2.1
Untracked files:
  (use "git add <file>..." to include in what will be committed)
    config/webpack/environment.js
    config/webpack/test.js
到这步的时候,webpacker 应该意识到自己需要重新编译所有资源了。这时候跑一下:
yarn install --frozen-lockfile
RAILS_ENV=production bundle exec rails assets:precompile
就应该能得到正确的 manifest 了。
支线任务:小内存的 Bug
在我这台 VPS 上面,由于刚才说了,内存很小,算上 Swap 也才 3 GB。这会导致上面命令编译失败。
在 这篇博客 里面找到了一个方法,修改 production.js 。
这里直接引用如下(修改三个设置):
mastodon@mastodon:~/live$ vim config/webpack/production.js
mastodon@mastodon:~/live$ git diff
diff --git a/config/webpack/production.js b/config/webpack/production.js
index 143a23b99..b22dd1661 100644
--- a/config/webpack/production.js
+++ b/config/webpack/production.js
@@ -14,7 +14,7 @@ const root = resolve (__dirname, '..', '..');

 module.exports = merge (sharedConfig, {
   mode: 'production',
-  devtool: 'source-map',
+  devtool: 'none',
   stats: 'normal',
   bail: true,
   optimization: {
@@ -22,8 +22,8 @@ module.exports = merge (sharedConfig, {
     minimizer: [
       new TerserPlugin ({
         cache: true,
-        parallel: true,
-        sourceMap: true,
+        parallel: false,
+        sourceMap: false,
       }),
     ],
   },
再跑一次命令,终于编译成功。
mastodon@server_name:~/live$ RAILS_ENV=production bundle exec rails assets:precompile
Compiling...
Compiled all packs in /home/mastodon/live/public/packs
`isModuleDeclaration` has been deprecated, please migrate to `isImportOrExportDeclaration`
    at isModuleDeclaration (/home/mastodon/live/node_modules/babel-plugin-lodash/node_modules/@babel/types/lib/validators/generated/index.js:2740:35)
    at PluginPass.Program (/home/mastodon/live/node_modules/babel-plugin-lodash/lib/index.js:102:44)
(👆 Warning 可以忽略)
现在,终于可以重启所有 Mastodon 的服务了!
sudo systemctl status mastodon-web mastodon-sidekiq mastodon-streaming
在折腾 10 个小时候我终于看到了熟悉页面。好吧也没有很熟悉,UI 换了一下。
后记
没想到这个东西能耗费我这么多时间。这个过程我输入了无数次查看日志的命令,反复寻找出错的原因。经常 Debug 的人也知道,错误输出的 Log 有时候有用,有时候和真正出错的原因相差十万八千里。所以真的不容易。
这个过程中 ChatGPT 帮了我很多。从前 Debug 都是 Google 以后转到 StackOverflow 或者 GitHub Issues。现在它会跟我说大概可能的 5-6 种原因。有一些东西一看就不对,排除掉以后的答案通常都是可以进一步了解的方向。ChatGPT Plus 目前是我觉得最值的订阅服务。而且即使没有 Plus,我们的时间利用效率也是得到了空前的提高。大概 3 年之内,用不用 ChatGPT(或者类似物)可能会成为区别人获取信息能力的分水岭,就像 20 年前人会不会用搜索引擎一样。
LanternD